Add Row
Add Element
cropper
update
update
Add Element
  • Home
  • Categories
    • Healthy Hatchlings
    • Wellness Weekly
    • Avian Lifesavers
    • Vet Talks
    • Behind the Feathers
    • Rescue Roundup
    • Aviary Secrets
March 10.2025
2 Minutes Read

Essential Care Steps for Your Injured Quail's Eye: Tips and Insights

Care for Injured Quail Eye: Close-up of quail with eye injury being held gently.

Understanding Eye Injuries in Quail

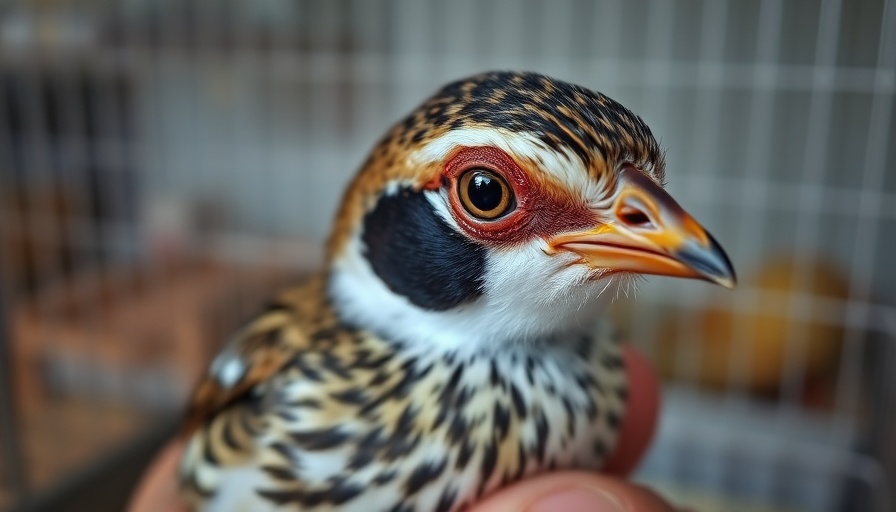
As curious and active creatures, quail are not immune to mishaps that can lead to injuries, including eye trauma. Whether caused by skirmishes with flock members or encounters with objects in their environment, eye injuries, like the one faced by our female quail, can cause significant worry among pet owners. Observing unusual behavior such as squinting, tearing, or the inability to open the eye can be alarming and warrants immediate attention.

Initial Steps for Care and Observation

The first step in addressing an injured quail’s eye is to safely and calmly remove the bird from its environment. According to veterinary guidelines, placing the bird in a quiet space is essential. Always check for signs of distress or any other injuries that may require veterinary attention. Avian specialists recommend gently washing the affected area with saline to remove dirt and bacteria. In any case of significant injury, prompt consultation with an avian veterinarian can provide tailored solutions.

Considering Treatment Options

In the case of minor injuries, applying an antibacterial cream can prevent infection. However, when a quail's eye is swollen and exhibits signs like redness or cloudiness, as seen in the injury of our quail, it’s crucial to evaluate the treatment plan closely. As mentioned in various veterinary resources, topical treatments such as Terramycin can be beneficial, but these should be used cautiously and under professional guidance.

Preventing Future Injuries

Once the immediate injury is managed, it’s critical to reflect on prevention. Keeping quail in a secure environment and monitoring their interactions closely can reduce the risks associated with eye injuries. Ensuring a habitat free from hazards and maintaining adequate space for each bird minimizes fights and accidents, fundamental to a healthy environment.

Live Updates: The Healing Journey

We learned through community discussions that healing time can vary, dependent on the injury's severity. Continuous updates indicate that while some birds recover fully, others may face complications such as corneal ulcers or scarring, impacting their vision. It’s encouraging to see cases where birds have gone on to live normally after healing, bolstered by the care of owners who are well-informed about avian health and treatments. Keeping an eye on the healing process is not just about physical recovery; it also involves emotional support as they reintegrate into their flock.

In conclusion, caring for an injured quail involves critical observation, timely intervention, and ongoing prevention strategies. As quail enthusiasts, staying updated on treatments and engaging with local avian health resources can empower pet owners to make informed decisions for their feathered friends.

Vet Talks

3 Views

0 Comments

Write A Comment

*
*
Related Posts All Posts
07.28.2025

Manual Egg Turners: The Key To Successful Hatchling Development

Update Understanding Manual Egg Turners: A Key to Successful HatchingEgg incubation is a delicate process, and proper positioning of eggs is crucial for optimal development. Manual egg turners are a common tool among avian enthusiasts, offering a hands-on approach to egg management. This method allows breeders to manually turn the eggs at designated intervals, replicating the natural rotation that a mother hen would perform. Understanding how we utilize these turners not only enhances the hatching process but also ensures the health of the embryos within.The Science Behind Egg TurningTurning eggs during incubation is essential as it helps to prevent the embryo from sticking to the shell membrane. When using manual turners, it is recommended to turn eggs at least three to five times a day. This mimics the natural behavior of birds, enhancing heat distribution and ensuring that the developing chick remains centered within the egg.The Benefits of Manual Turners for Chick HatchingManual turners can help aviculturists maintain direct control over their incubation practices. By allowing for interactive management, these turners can be a more engaging and informative approach compared to automatic models. Additionally, breeders can observe the eggs closely, checking for any signs of infertility or developmental issues.Challenges and ConsiderationsWhile manual turning offers clear advantages, it is not without its challenges. Consistency is key; forgetting to turn the eggs can lead to poor hatch rates. Breeders must also consider their commitment—manual turning demands attention and can be demanding for those balancing other responsibilities.Conclusion: Making Informed Decisions for Healthier HatchlingsIncorporating manual egg turners into your incubation process can lead to more successful hatches. By understanding their operation and potential challenges, breeders can make informed decisions that align with their goals. Experimenting with various turning schedules may also yield optimal results, showcasing the uniqueness of each breeding operation. Therefore, reflecting on the mechanics of manual turners can significantly impact your future hatching successes.

07.28.2025

Navigating the Challenges of Integrating a Single Duck into Your Flock

Update The Nuances of Integrating a Single Duck Integrating a solitary duck into an existing flock can bring about challenges that require careful consideration and strategy. The process is akin to introducing any individual animal into a social group; it necessitates understanding their complex social behaviors. Ducks, being social creatures, usually thrive in groups, but introducing one to a pre-established flock can provoke territorial disputes and stress. Preparing the Flock for Integration Before introducing the new duck, certain steps should be followed to ensure a smoother transition. Gradual introductions can mitigate stress for all parties involved. Start by allowing the duck to observe the flock from a safe distance, such as through a fence or a divided area. This way, they can acclimate without direct confrontation. Monitoring Behavior Post-Introduction Once the integration begins, closely monitor how both the new and existing ducks interact. Signs of aggression, such as biting or excessive chasing, may indicate that immediate separation is necessary. It’s crucial to have a separate area where the new duck can retreat if feeling overwhelmed. Behavioral observations can provide insight into how integration is progressing, helping you identify potential issues early. Conclusions and Best Practices Integrating a single duck requires patience and understanding of avian social dynamics. Providing adequate space, monitoring interactions, and being prepared to separate the duck if needed can create a harmonious flock environment. Successful integration improves not only the well-being of the individual duck but also enhances the overall social structure within the flock.

07.27.2025

How to Calculate the Right Amount of Construction Sand For a 13×16 Coop

Update Calculating the Right Amount of Construction Sand for Your Chicken Coop Building a chicken coop not only requires proper design but also careful consideration of the materials used, particularly flooring. For those constructing a 13×16 coop, one common flooring choice is construction sand, appreciated for its drainage capabilities and ease of cleaning. Knowing how much sand to purchase can save you time and money. Estimating Your Sand Needs The first step in calculating the amount of sand needed is to determine the volume of the coop's flooring area. Since your coop measures 13 feet by 16 feet, the total area equals 208 square feet. The depth of the sand layer is typically about 2-4 inches. For this calculation, we will use 3 inches, which is a standard depth for effective drainage, allowing for waste management and comfort for the chickens. Volume Calculation To find the volume of sand required, the formula you will use is Volume = Area × Depth. In this case, convert the depth from inches to feet (3 inches = 0.25 feet). Thus, the volume of sand needed is: Volume = 208 sq. ft. × 0.25 ft. = 52 cubic feet It's important to note that construction sand is usually sold by the cubic yard. There are 27 cubic feet in one cubic yard, so to convert cubic feet to cubic yards, divide by 27: 52 cubic feet ÷ 27 = 1.93 cubic yards Therefore, you would need approximately 2 cubic yards of construction sand for your coop, accounting for settling and potential compaction over time. Considerations for Choosing Sand Selecting the right type of sand is equally crucial. Construction sand should be free of contaminants and have a size that provides good drainage. Avoid any sand that could cause respiratory issues for chickens. Consulting local suppliers about the best options may provide additional insights. Final Thoughts Properly calculating and selecting the right amount of construction sand can significantly enhance the health and comfort of your chickens. As you create your coop, remember to ensure adequate ventilation and consider how the flooring can contribute to a clean environment.

Terms of Service

Privacy Policy

Core Modal Title

Sorry, no results found

You Might Find These Articles Interesting

T
Please Check Your Email
We Will Be Following Up Shortly
*
*
*